Pages

21 November 2011

033 - A TV rack that isn't

This is a TV stand "that isn't". The design has been so cut to the bone, that there's only the structure left. Updated May 2017


During the design process, I knew that this extra TV set should be viewed from either a sofa at rather short distance (2 m) or from the floor on pillows with grandchildren, but also from some chairs at a straight angle (3 m). It should also be possible to push it away under the work bench, which we didn't want to lose.

Television sets these days have speakers from the travels to the moon in the sixties. So, I bought a small set of active speakers that in a snap turned the system to a home cinema. Well, almost.

At first I though I should make a more regular rack with two levels, so that the TV could be liftet up. Even if the viewing angle now is a little more downwards than ideal, I dropped it. No matter how I twisted the design I did not get there. It got too complicated and too clumsy. It's not a daily set, so it's ok.

So, I made this frame that the speakers virtually is held onto. I found two steel sides from an Ikea hat rack from an earlier project, where only the steel tubes were used (not in the catalogue any more). They now are the small "shelves" (20 mm) at the bottom left and right sides - and the rest are the "arms with hand" that hold the speakers. Even if the weight difference is almost one to two, there is enough friction and static "moment lines" to keep them 15 mm above the floor, enough for the carpet to pass under. The final arm length is adjusted with two wing screws. I did not have to fasten the arm to the rest of the structure. All contact with the laquered speakers is protected with rubber.

The TV is placed and held in the structure, in the front, one on each side in the back, and the special piece in the center, back. The hole in the front is for fingers, but the TV base may also be held, even when the rack is pushed or pulled around. I glued felt underneath, which makes is easier to drag than I thought.

Since there is no bottom front, there is place for the feet while we sit at the bench, and want to forget about the TV. I will find a little more protection for the speaker membranes, even if that's really not where the feet would naturally be. I'll hide it behind the front covers.

There is a Blu-ray box that also takes care of internet connection not seen in the pictures, by a HDMI cable. The box sits fine in a book shelf. On the picture it streams the video of Norwegian jazz singer Solveig Slettahjell who sings Tom Wait's "Take It With Me" at the Oslo Jazz Festival in 2010: http://youtu.be/Q60YUnpbbHQ, from NRK 1 tv. Now, that's a favourite!

The central piece with the round hole is part of an obsoleted & never used Ikea cutting board. The TV is a 32 inch, 16:9 set.

If I were to make this prototype again, the lists may have been some (2 mm?) sleeker. Of course, birch would have made it more elegant than spruce, but not in that room. Also, the vertical lists on both sides should pass through the horizontal list aup to the end of the speaker. This would shortcut the crosssover moment, to make different speaker weights almost irrelevant.

Search words in Norwegian: tv-bord med høyttalere som klemmes fast, som kan dyttes bort under et arbeidsbord.

UPDATE. I needed to add a shelf for a combined DVD and Blu-ray player (the old one broke) plus an Apple TV. I had decided to make this rack hold all gadgets. Even if I did come home with the least wide DVD/Blu-ray player in the shop it was just too wide. So I unscrewed the base (possible since I hadn't glued anything) and aligned the center piece two cm to the left. Only noticeable if you know it. I then was able to have both units fit on two small shelves - again made by plastic chopping boards. In my shop these are material. Here's a picture of the 2017 add-on:


.

07 November 2011

032 - Pull-up / lift-up curtain

We found these beautiful cotton cloths in Monticchiello in Italy. Three of them were sown together, to make a privacy curtain at the new toilet room at home.
While washing or sitting on the toilet we thought that when it's dark outside, the need for privacy starts from below. And it ends at the top: maybe we would like to look out on the nice trees and the park while actually doing those activities.

I went to a curtain shop or two and found a rod that could be used, not as roll-down or drop-down rod, but as roll-up, pull-up or lift-up curtain rod. It is an aluminum tube with a spring inside, and no lock. A standard rod with the lock removed will do.

Two small wooden pieces were screwed to the lower part of the window, to hold the rod. Fasten one first, then slide the curtain in place and then screw the other side.

I did not want to use a rope and pulley to lift (i.e. pull) the curtain in position, and something to keep it in position. I didn't think it would be simple and elegant enough. My "cliffhangers" were stoppers at each side of the window frame. Each is made of two wood pieces that are cut at angles so that they lock in position with only one screw. I used a screw to lock, and a tiny nail to keep the other from falling.

Search words in Norwegian: rullegardin som løftes eller dras opp til bruk på wc eller badet 
.
.

03 October 2011

031 - Wooden window trickle air vent cover

I replaced some 30+ years old windows the other day. For three of them we had ordered an upper tricle air duct. Our house does not have any fans or balanced venting system. It's a wooden house with 99% electric heating. There is only hydro power stations in Norway, and that type of heating has had an ok price tag.

The air ducts have a barrier inside, so the air is really trickling. On the outside there is protection for rain and insects. But the inside cover that came loose with the windows was of extruded aluminum with two fastening plastic joints, one on each side. There was no way for any "remote" control, to stand on a chair was the only option. The aluminum was isolated on the side towards the vent, but I still assume that humidity inside could condesate on the relatively cold aluminum when it is really cold outside. I have also seen the brass covers, where two rulers with square holes overlap between more (open) or none (closed). Also weak on condensation I assume, and very difficult to remote control with only a few grams of pull. It would need much more, and both push and pull. So I wanted to make something else.

Wooden, that could easily be controlled without standing on a chair, and no surfaces to condesate on.

This post describes the three, all different solutions. All were made from birch with a thin round wooden rod or stick glued to the back. The covers swing on this rod. The center of gravity is outside the wall, so it's pressed to the opening, to keep closed. In other words, there has to be some pull to hold it open. And in open position the vent opening looks ok. The first solution is stable anywhere between open and closed, while the two others are open or closed only.


1. The upper row (above) shows the one that's controlled by twisting the curtain rod a quarter of a round. I use fishing line as thread, but sewing thread may be just as good, since the nylon seems to stiffen around the eye screws. The pictures may talk for themselves.


2. The above pictures show how it's done in the shower in the bathroom. The plastic curtain takes 99.9% of the shower's splash. However, it would be essential to make it easy to open and close the vent, and see the position - without removing the curtain. There is one wooden dowel pin on the top, and one "via"-point to shorten the wire. The left picture shows the closed situation without the plastic curtain, (removed for the photo), the right picture shows the open position with the plastic curtain (alway present). (On the left a drop drip silicon row is seen, behind the curtain.)


3. Here is the third solution. It's easily reachable while standing, so there is no wire. The left position is open, held by the brass angle (?) screws. I use those screws to just hold all the covers. The right picture shows the closed position, where the cover has been pushed to the right and fallen into closed position. There also is a locked position (with no picture), where the cover is pushed to the left. So the angle screw keeps the cover locked in both open and closed position. This could be ok it it's blowing a lot outside. The other solutions take no height for locking, so I'll just have to wait and see. But the barriere and the pressure by the weight also has quite some locking effect.

Search words in Norwegian: innvendig deksel for lufteventil i vindu
.
.

26 September 2011

029 - From ceramic vase to cutlery drainer


The raku ware cutlery drainer bought at Powdermills Pottery at Dartmoor, England drew to a close the other day, after more than ten years in use. I had glued one of its legs a couple of years ago. Now it was terminal.

Since we don't do all cutlery in the washing machine, we wanted a new drier, and found a cylindrical ceramic vase at the Norsk Folkemuseum in Oslo. At the pottery shop we quite liked Hege Stenseng's vase.

I bored an 8 mm hole in the center, with a ceramic tile drill bit, at slow speed, with some water to cool it. Then I took the plastic tube that came with a concrete screw and fitted it through a red plastic "fan" and into the drainer from below. It's also 8 mm and fits tightly. Water then passes through the tube to the sink, where it would air dry.

The plastic fan constitutes six feet. I always keep some IKEA chopping boards ("Legitim") in my shop, ideal for material - used for the fan. It's easy to saw and cut with a knife. I cut the fan so that the ends would become feet, and the center about 2 mm from the bottom, so that water will not cling and stop the drainage. (I actually had to cut off some more material to raise this gap to 4 mm, the bottom was too wet when it shouldn't - and I did see hanging water underneath - seen when testing it on a glass surface.) This also makes the feet "coming down", and the unit will not ride on the center - it's important that the unit must not tip over. I want it to last at least ten years!

The cutlery holder "dish drying rack" dismantles in a split second, and is easy to wash. In the picture, the hole in the fan matches the round stamp, since the vase is not that round. This makes a more even appearance of the feet.

The above DIY prototype only "discusses" the theme. Now I know how to make a next. Please help me with English terminology..

Search words in Norwegian: keramisk porselen steingods bestikkurv bestikkstativ vase til å tørke oppvask.
.

028 - DIY prototype of an iPad 2 holder for car glove compartment


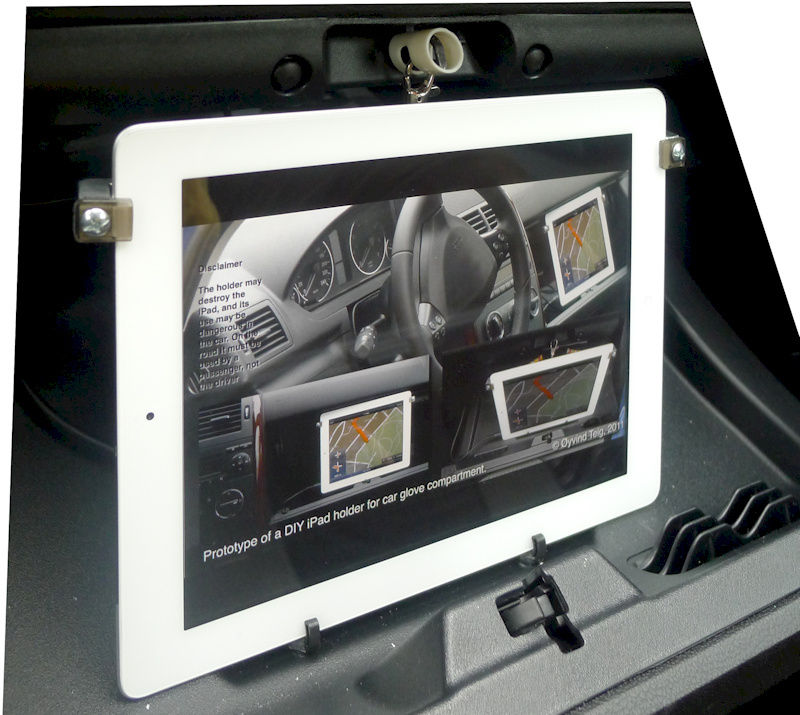
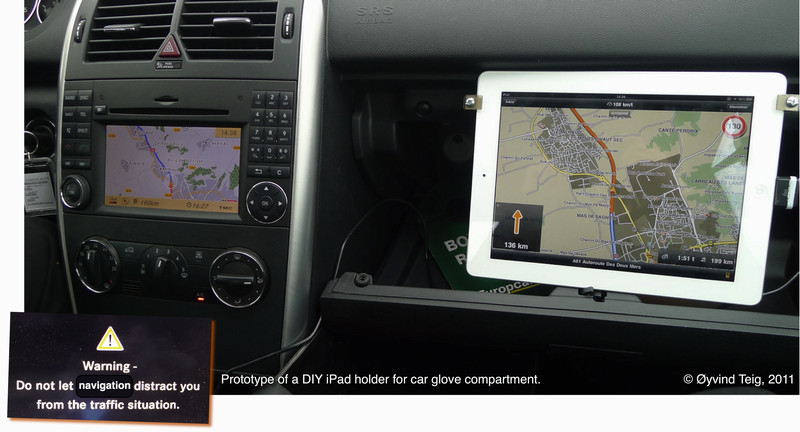
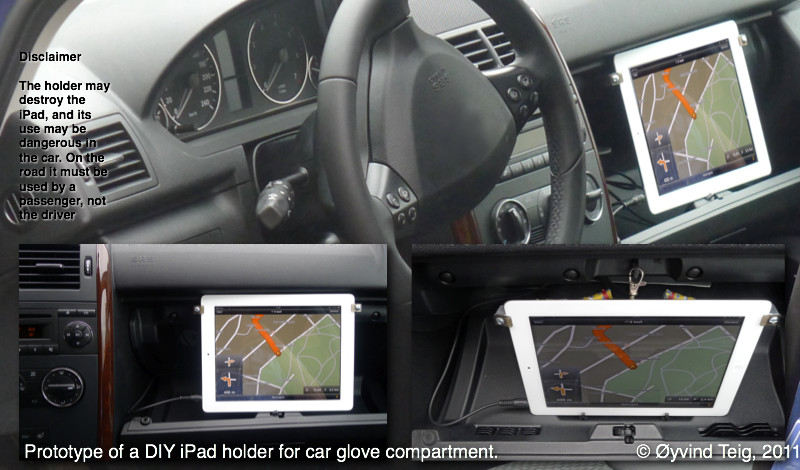
  • Prototype of a DIY iPad holder for car glove compartment. © Øyvind Teig, 2011
  • Disclaimer: The holder may destroy the iPad, and its use may be dangerous in the car. On the road it must be used by a passenger, not the driver. This is not a general iPad mounting device for dashboards.
  • You may have a car with a glove compartment where the suggestion described here is impossible, no matter how much you tweak it!
  • There are lots of non-prototype, well developed, off the shelf holders to buy out there! (Like http://www.tabletbite.com/top-ipad-2-car-mounts-chargers-and-car-accessories-2149/)
  • Created 23July11, updated 9April12
The need

We recently bought a new car, but navigation and an advanced music system we purposedly left out. Good sound and an aux input was all we required, which the standard system did deliver. None of us use the car every day since we work within walking and cycling distance from home. And we thought that no matter how modern or advanced any such system would be today, a year or three from now it might not be that glamerous. Also, we had an iPad 2 that we thought could be used in the car.

So, we went for the passenger glove compartment. To my delight I saw that there were some clips, probably meant for a pencil, but could also hold the iPad 2 - which sits beautifully in the bottom of the compartment. This would be a "lower" position (picture below, inset, right).

I used a kitchen type rubber band for a 100 km travel test, and I quickly saw that the flexible grip it gave, was perfect. I attached the rubber band in the top glove compartment lock ring, made of metal. The iPad fell nicely into position, horizontally, and did have a place to lean to on the back, top edge. The volume control in the top had free space above it.

It was also possible to place the iPad in the lower lock mechanism, in an "upper" position (main picture below, and inset, left). In both positions, the screen was easily readable from the driver seat, and the passenger (me or my wife) was eaily able to handle the touch screen, as well as the side buttons. And it didn't feel to take away much foot or leg space.

Also, a cable between the headphone output and aux input connected the iPad with the car, as we didn't buy blue tooth in the car. Most importanly, the integration between the iPod music and the Navigon navigation apps works fine. When "the lady" tells us where to drive, the music is faded. And: the GPS did work like a dream, it seemed to see the satellites. We were on the road of the navigation screen all the time.

Additionally, with a better holding mechanism than a kitchen rubber band, it could probably be made rather secure. However, see disclaimer above and in the pictures.

Aside:
Charging an iPad in the car ::
- Battery life is enough for a long day's driving.
- However, being able to continuously charge on the road still feels quite ok. For us : with navigation and music running, with the iPad 3.5 mm ear phone or sound output connected to the car's music system's aux input. The first solution is mentioned below, but it made too much electromagnetic (EMC) noise in a "ground loop", so it's useless.
- We ended up with a Kensington PowerBolt car charger. It delivers 5 V (Volt) voltage at 2.1 A (Ampere) current required by the iPad. There is not hearable EMC. So it must be a switchmode (switching mode DC/DC) power supply, even if I can only assume that from my calculations below. I mailed Kensington support, and they replied that this information was not available. Fair enough, but I still think it's a switch mode power. Kensington also has a PowerBolt Duo, which delivers two USB 5V outputs, at 2.1 and 1 A. At full load for half an hour, busy charging an iPad anf an iPhone at the same time, it heats up to 60-65 DegC in our car - since I could touch the metal parts, but not for too long. This rather low temperature and assumed heat removal from the contact, strengthens the switch mode case: the Wattage loss could not be 3 A * (14-5) = 18 W, as it would have for a series regulator. But I am only 65% sure!-) As an electronic engineer I'm impressed by these units' low EMC emission, and ground loop high frequency currents. Thanks, Anders, for tipping me about them!
- Not suitable for iPad, only for laptop charging with the music system off: An iPad power may easily be connected. But our 12VDC (Volt DC), supplied in cigarette lighter car connectors - to 230VAC (Volt AC) inverter (*1) generated too much EMC noise for the aux connection (being a switched mode power supply). Having a reliable 230V AC source in the car is so nice, because we can use the standard chargers, and also use a laptop in the car - simultaneously. In the new car, one of the 12V connectors do have power also with the key out, so it's possible to charge at stops using that inverter.
- But I will be trying a 12V to 5V charger, the iPad needs 2A - of the type that sits directly in the cigarette lighter connector. However, I would doubt that this could be made non EMC (as serial regulated with full power loss), since 14W (Watt) heat is rather stiff to get rid of inside the connector (Max 12V - 5V = 7V times 2A is 14W). I'll keep you updated.
(*1) "150W Power Inverter" from a manufacturer called "am" (bought over the counter at Mamoz here in Trondheim). We have used it flawlessly in the car some years now. It's small and rugged, all metal and no fan, with 90% efficiency (so it would need to cool 15W, relate that to the cigarette power supply). It replaced a plastic unit with a fan from another manufacturer that lasted one trip before parts of it melted. But Mamoz took it back.
The prototype


I have erased the car maker logo in the middle of the steering wheel in the above picture.

You need some aluminum, a good metal saw, two bicycle spokes, a rubber band, screws, solid plastic (I used som lexan), tape, a carabiner of some sort, cable ties and a spare few hours. I found all of this in a spare box in my shop. (Please help me with correct English words in this blog, my vocabularly falls short in this field.)

The iPad's glass is somewhat protected by its aluminum edge. But the pressure on the glass should of course be as small as possible. Using lexan plastic on the top, and a piece of tape inside, will fare well with the glass and avoid stripes which easily could have the glass fracture.

I will not do a do-it-yourself DIY recipe here. You'll make it, and hopefully you will laugh last.

The strecth in the rubber band is about 2 mm. Pull the holder 2 mm apart and slide it down from the top, or pull it at more strength and place it anywhere. This should be enough pressure, I believe. With that pressure, it's even possible to hang it up like a picture frame. Don't do that, ever.

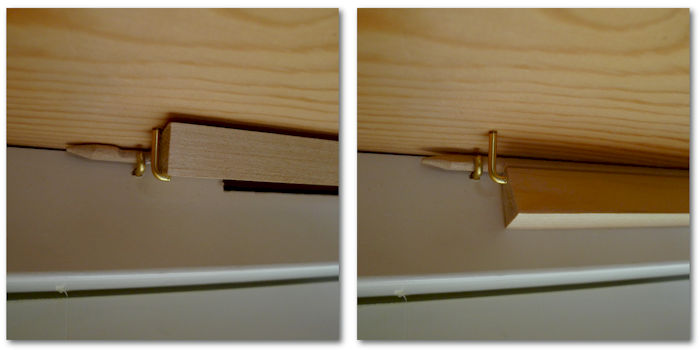
At first I thought it best to curve the inside of the two aluminum hands, to follow the iPad 2's curvature. With the present solution, however, there's space for iPad 2 switches, camera lens ring etc. And also space for the flat end of the bicycle spokes, seen in the right part of the picture above.

The pressure to the sides is also relieved a good deal by the end of the aluminum hand which is pressed to the back side of the iPad. This probably also tightens the grip better, so that a shock will hold it better in place.


Be sure not to set the iPad on anything metallic, to avoid glass fracture when the car bumps up and down. If it's placed by the lock mechanism in the door, check that all parts there are plastic. I glued a piece of rubber inside each of the plastic bottom clips, as I believe that must be better than hard plastic. Also, should it kick 
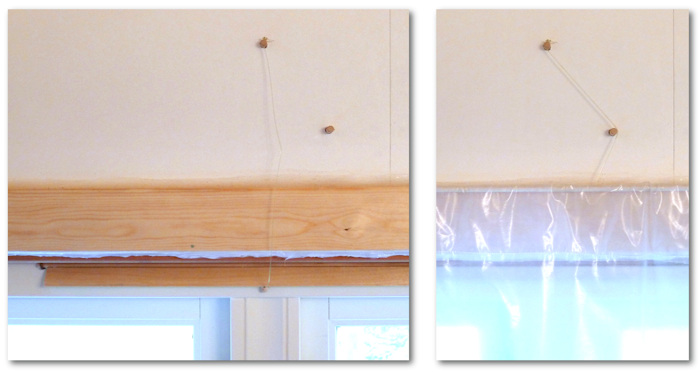
up, have a look at the scenario and see what happens if the iPad's aluminum edge hits the top lock ring, which probably is metal. If Apple had designed for this, the less than one mm aluminum frame protecting the glass edge might have been made thicker. However, you might need a piece of rubber or perhaps leather up there? I found a plastic tube that seems to do the job (above). It slips easily on and off, and the lock holds it in place.

Also, find a good elastic rubber, the cheaper the less useful. I tested some in the garage, and found only one that I thought acceptable. It should not feel like chewing gum.

Post script: bringing it abroad

The other week we went to France and again rented the same car model, the one that we have at home. I packed the iPad 2 holder, the charger and the 3.5 mm sound cable. I did not succeed in connecting the iPad sound via Bluetooth, and there was no 3.5 mm aux input like at home, so we had to listen to the Navigon navigation lady from the box. This was better than one should think, and the iPad 2 only needed to be switched so much up.

The nice thing was that the holder worked like a dream. Also on the row of small bumps just before pedestrian crossings, even if I forgot to bring the plastic shield for the lock. We kept the iPad 2 in the upper position always. It did the little dance it should.

I started by stating that it's best with two persons in the car. It still is, but I heard that some built-in car navigation systems inhibit you to do quite a lot while driving. One may have to stop to set a new goal, I was told. Then, the difference becomes less.

By the way, the Navigon / iPad 2 pair in many ways outperformed the built-in system. Of course, except the integrated features which piped the most important info to the dash board's front display (like direction and road number). And the integration with the rest of the multimedia functions.

Search words in Norwegian: prototyp stativ holder for iPad 2 for bruk i hanskerommet på bil, som du kan lage sjøl selv, som ikke skal betjenes brukes av sjåfør i fart, bare passasjer, kan ødelegge iPad. Blåtann.
.